Dodge Challenger Forum banner
21 - 40 of 180 Posts
Discussion starter · #21 ·
I'm aware the 5.7 / 6.4 use the same length pushrods.

I've always recommended going with chrome moly (higher strength) 'rods. The .080 wall thickness is plenty and retains the same diameter oil feed passage through the pushrod.

Manley makes a set for Gen III Hemis - used them on all the cam swaps I've done
 
Discussion starter · #24 · (Edited)
I'm aware the 5.7 / 6.4 use the same length pushrods.

I've always recommended going with chrome moly (higher strength) 'rods. The .080 wall thickness is plenty and retains the same diameter oil feed passage through the pushrod.

Manley makes a set for Gen III Hemis - used them on all the cam swaps I've done
Thanks for chiming in Hal (should have just PM'ed you to begin with but I like to learn how to fish), I agree on the chrome moly. Fortunately the push rods were the first thing I upgraded back when I complained about the sewing machine noise (was actually one of my earliest posts on the forum). Although I went with the comp cam ones which is still loads better than stock rods.

https://www.highhorseperformance.com/Comp_Cams_VVT_5_7L_HEMI_Pushrods_p/7929-7748.htm

What I was not sure about were the lengths (primarily because most references I saw were for pre-eagle 5.7s). Even though the same lifters, push rods, and rockers are used across the engines I thought the different spring install heights might have meant a change was needed, which is not true. The cool thing is what is good for a 6.4 to 5.7 cam swap also holds true for a 6.2 to 5.7 swap. Might have been obvious to others but hey...I'm slow.

I really can't wait to get the cam and springs. I know going with an aftermarket grind will yield more power but once you piece everything you need it comes out to +$2k. Even if this only nets me another 20HP I would say the swap is worth it considering this will cost me less than a custom cam itself.
 
Discussion starter · #25 ·
Great find


Sent from my iPhone using Tapatalk
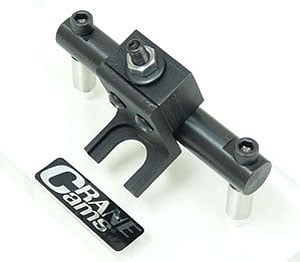
I was hoping to find a used one on ebay or craigslist but could not find one. Found it by searching google images and took a chance on clicking the snap-on version, mainly because I was expecting to see the ridiculous price...boy was I pleasantly surprised. Would have never guessed this tool would be more inexpensive through snap-on.
 
IIRC the '09+ Hemis are 6.800" and 8.100" for the push rod lengths.

Yes the prices on the billet and custom cams - $800 + which is nuts. That's the price of crankshafts...

The OEM cams have good all around driveability, will tolerate idling in traffic, yet tuned for power bands where you need them for street driving.

Throw in a lopey cam and they kill low range power and drivability, and your in town MPG drops as you need more throttle and revs to overcome the inefficiency at low rpm.
 
Wow, snap-on was fast...the tool was delivered today and I ordered it yesterday using their free shipping option!
I got one of these from HHP. They had a patent pending, they must have missed the boat on it or maybe they are getting royalties. I also use the moroso air hose kit. bought them together as a package.

https://www.highhorseperformance.com/Hemi_Valve_Spring_Tool_SAHVST_p/sahvst.htm
https://www.highhorseperformance.com/SearchResults.asp?Search=Moroso+Air+Hose+Kit+-+62385

I put the cylinders on TDC just in case I lost pressure. The valves won't drop down so far that you can get them back up into position. I have only done it twice but never had an issue with the valves dropping, but better safe than sorry.
 
Just got off the phone with one of the guys at Steve White and he confirmed the 6.4/6.2 springs will fit on the 5.7 eagle heads but the P5160074 spring are the better route to go with as they are designed to handle more lift and produce more force than the 6.4/6.2 springs. So basically, if you are going to swap a 6.4 or 6.2 cam into a 5.7 (eagle engine) then all you really need is the cam and P5160074 springs. Although if you are going through the trouble it is best to upgrade the pushrods as well. Like I showed in one of my early posts, the stock pushrods are not the best quality. Can't wait to get the parts. I will post up measurements of the cam journal diameters and base circle of the 6.2 cam and eventually of the 5.7 when it get's pulled.
i just posted check it out www.challengertalk.com/threads/finally-an-answer-to-mopar-performance-valve-springs.673094/#post-8499897
 
Discussion starter · #33 ·
ChallyTatum.. Cam installed yet?
Not yet...and it is killing me. I have emissions coming up this October (IL won't let me test earlier) and I just got all the monitors to pass...yet again (they reset whenever I modify the tune). Stupid O2 is a pita as it takes several attempts running through the drive cycle given by the FSM to get it to pass. Probably won't get the cam in until after emission. Until then I have the cam and springs sitting in a covered pan of oil.
 
Not yet...and it is killing me. I have emissions coming up this October (IL won't let me test earlier) and I just got all the monitors to pass...yet again (they reset whenever I modify the tune). Stupid O2 is a pita as it takes several attempts running through the drive cycle given by the FSM to get it to pass. Probably won't get the cam in until after emission. Until then I have the cam and springs sitting in a covered pan of oil.
sorry to hear that , mines going back together
976924
 
Discussion starter · #36 · (Edited)
sorry to hear that , mines going back together View attachment 976924
Sweet!

Fortunately I don't have to remove the heads...and I am pretty sure my supercharger can stay on as well as all I need to do is remove the front clip, rad, intercooler, water pump, damper, valve covers, timing chain cover (going to tap the back coolant hole for an NPT fitting to get rid of the magnuson loctited fitting) and swap the springs.

Instead of counting sheep at night...I go over the whole swap in my head...but doing that actually keeps me up at night as I am dying to git..er...dun.

Although I have been really enjoying the challenger these past couple of months...kind of nice just driving it instead of wrenching on it.
 
Sweet!

Fortunately I don't have to remove the heads...and I am pretty sure my supercharger can stay on as well as all I need to do is remove the front clip, rad, intercooler, water pump, damper, valve covers, timing chain cover (going to tap the back coolant hole for an NPT fitting to get rid of the magnuson loctited fitting) and swap the springs.

Instead of counting sheep at night...I go over the whole swap in my head...but doing that actually keeps me up at night as I am dying to git..er...dun.
noes removal was not that bad , had mine off in about an hr by myself. they say you can pull cam without head removal just have to remove rocker shafts . they say , however the only thing holding the lifters is that plastic yoke , if the lifter was a bit loose in that it could fall in . theres not much resistance holding them in that yoke.

its nice to be single i can rebuild my engine in my house if i want ,could never do that when i was married lol.
 

Attachments

Try the sequence below. Emission readiness on my car would complete on my 65 miles drive to work and back when i was getting daily tune from Johan. Also, my 6.7 cummins diesel truck would complete emission readiness in 35 mile drive but that include driving behind a big rig @ 50mph:)

btw, i cant wait to see how much power you will gain from your upgrade:)

Try the below.


Chrysler Drive Cycle Information

All Monitor Drive Trace

Pre-Conditioning Requirements:
– MIL must be off
– Cold start (Note: cold start temperature is undefined)
Driving Procedure
1) Warm engine up for five minutes (must reach closed loop)
2) Drive (with steady throttle) at a speed between 40 and 60 mph for 8 minutes.
3) Stop and idle for 3 minutes.
4) Drive (with steady throttle) at a speed above 20 mph for 2 minutes.
5) Turn key off, leave off for ten minutes (to run O2 sensor heater monitor).
Note: Due to the limited preconditions provided with this drive trace, NCVECS recommends using the monitor
specific drive traces for Chrysler vehicles.

Catalyst Monitor Drive Trace
Pre-Conditioning Requirements:
– MIL must be off.
– No DTCs present.
– Fuel level is between 15% and 85% full.
– ECT above 70º F.
– Engine must have run at least 90 seconds
– Engine between 1,350 & 1,900 rpm.
Driving Procedure
1) Idle vehicle for five minutes (to reach closed loop operation).
2) Drive with a steady vehicle speed between 30 and 45 mph for 2 minutes.

EGR System Monitor Drive Trace – Vacuum controlled
Pre-Conditioning Requirements:
– MIL must be off.
Driving Procedure
1) Idle vehicle for five minutes (to reach closed loop operation).
2) Drive with a steady vehicle speed between 40 & 60 mph for 8 minutes.

EGR System Monitor Drive Trace – Electronic
Pre-Conditioning Requirements:
– MIL must be off.
– MAP must be between 0-60 KPa.
– Engine speed between 500-850 rpm.
– ECT is above 180º F (90º C).
– No misfire temporary (pending) or matured fault present.
– A/C clutch, PS Switch and Cooling fans do not change state (turn off).
Driving Procedure
1) Idle vehicle for five (5) minutes (to reach closed loop operation).
2) Drive with a steady vehicle speed between 40 & 60 mph for 2 minutes.
3) Idle vehicle for three (3) minutes.
Note: This monitor evaluates EGR flow based on a change of engine roughness (idle stability).
Conditions causing un-stable idle will prevent this monitor from running.

Evaporative System Monitor Drive Trace
Trace 1: Standard Type
Pre-Conditioning Requirements:
– MIL must be off.
– No Evaporative DTCs present.
– Fuel level is between ½ and full.
(Note: monitor may still run with tank fill between 15% and 85%).
Driving Procedure
1) Idle vehicle for five minutes (to reach closed loop operation).
2) Drive with a steady vehicle speed between 30 and 45 mph for 2 minutes.
Trace 2: Leak Detection Pump
Pre-Conditioning Requirements:
– MIL must be off.
– No Evaporative DTCs present.
– Fuel level is between 30 & 85 % full.
Driving Procedure
1) Cold soak vehicle, start and idle vehicle for 4 minutes.
2) Drive in-town (stop and go) for 5 minutes, using smooth accelerations and decelerations.
3) Stop and idle vehicle for 4 minutes.

O2 Sensor Monitor Drive Trace
Pre-Conditioning Requirements:
– MIL must be off.
Driving Procedure
1) Idle vehicle for five minutes (to reach closed loop operation).
2) Drive with a steady vehicle speed above 25 mph for 2 minutes.
3) Stop and idle for 30 seconds.
4) Smoothly accelerate to a speed between 30 and 40 mph.
5) Repeat steps 3 & 4 five (5) times.

O2 Sensor Heater Monitor Drive Trace
Pre-Conditioning Requirements:
– MIL must be off.
Driving Procedure
1) Idle vehicle for five minutes (to reach closed loop operation).
2) Shut engine off and leave vehicle off for ten minutes.


Not yet...and it is killing me. I have emissions coming up this October (IL won't let me test earlier) and I just got all the monitors to pass...yet again (they reset whenever I modify the tune). Stupid O2 is a pita as it takes several attempts running through the drive cycle given by the FSM to get it to pass. Probably won't get the cam in until after emission. Until then I have the cam and springs sitting in a covered pan of oil.
 
21 - 40 of 180 Posts